
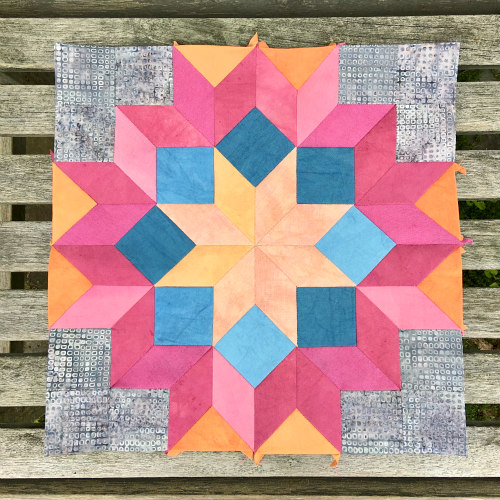
Do you have quilt blocks on your must-make list? For years, the Carpenter’s Wheel has been on my list and I’m pleased to say I’ve just completed it. I used English paper piecing and my hand dyed fabrics plus gray batik for a feel-good result!

I really like the difference in textures between the linen and the sateen.
I considered making the Half Square Triangle version of this traditional block, but my affinity for hand stitching made EPP the clear choice in the end. I’m glad I chose paper piecing because I really like the way the individual shapes look with my hand dyed sateen and linen fabrics. This season, I’m adding naturally dyed linen to my product offerings, and I hope you’ll love using it as much as I do! It adds a lovely texture to the finished piece, and it’s a pleasure to stitch. In next week’s post, enjoy an inside look at what my current dye season looks like. Spoiler alert, there’s pretty fabric every where!
For now, I’d love to share how I went about assembling my Carpenter’s Wheel using EPP. If there’s interest in an in-depth EPP tutorial, I’ll gladly put one together. Let me know your thoughts in the comments below.
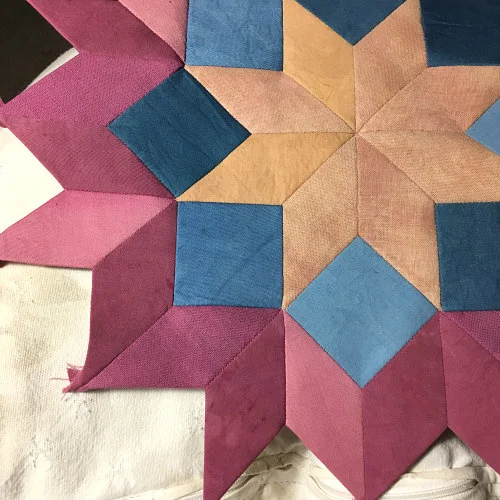
Back to the Carpenter’s Wheel: starting with the center star made of 45 degree diamonds, I found it helpful to stitch two units of four diamonds (one unit is shown in the photo), and then with right sides together, line up the center meeting point and stitch the two units together. I’ve used both sateen and linen for my star.

Round two in process, adding the indigo squares.
Next, each of the 2” squares wrapped with indigo sateen were stitched to the center star. I saw versions of this block on Pinterest with an alternating light-dark pattern all the way around each of the rings providing a nice dimensional look, but using my scraps meant I simply needed to make do. So, I randomly placed my colors around the design for variety and to keep the eye moving.
The third round, comprised of more 45 degree diamonds, was easily handled by stitching together units of three diamonds and then stitching each unit between two indigo squares. On Instagram, I received comments about how nicely the points meet, and my stock answer is that English paper piecing makes it easy! As with any technique practice makes perfect, but for the most part the papers do the heavy lifting.

My tip is to stitch together sets of three diamonds before attaching them to the squares of the previous round.
The different backgrounds for these photos reveal the numerous places I like to stitch at home!
I chose a gray batik for my outer squares and my hand dyed cotton for the triangles. You can see in the photos the order in which I assembled the squares and then attached the triangles. I’m not sure it would matter whether the triangles were attached before the squares, but this order just felt right to me.
I use Clover mini clips all the time with my EPP. For a long while I resisted using them, but now I consider them an essential tool! For me, they make the process more efficient and a little easier on my hands.
For now, I’m deciding how I’d like to quilt this block, and I think its final form will be a mini quilt. Seeing the shapes and colors come together with each successive round was a thrill, and I’m already considering colors for the next one! If you have a favorite block on your must-make list, I’d love to hear about it in the comments below!
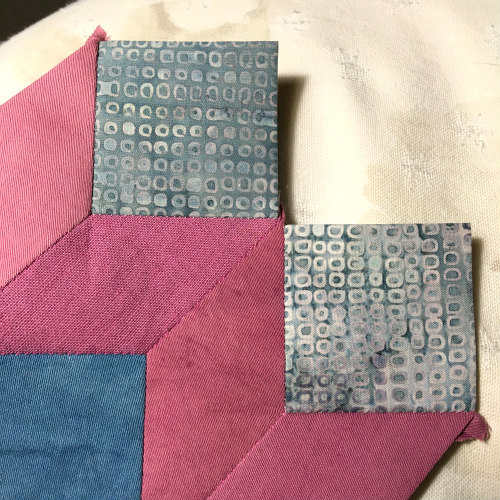
I stitched two squares at each outside corner before adding the third, forming the block’s corner.
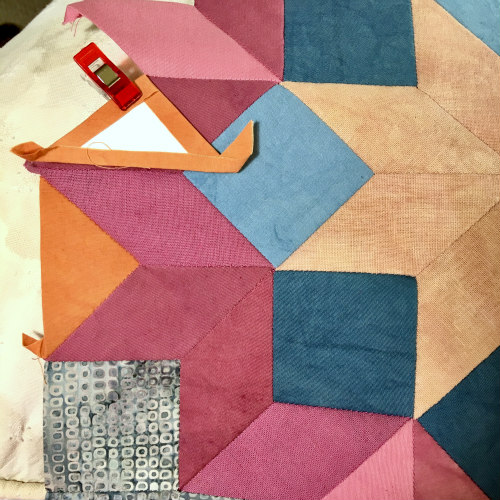
My last step was to attach the triangles, two per side. Those mini-clips sure come in handy!

Plucking Spruce tips for tea and for pickling.
Spring time brings a flood of foraging, planting and preserving. I confess I love it all!

Spruce tips are loaded with Vitamin C, and if you have them growing close by consider reaping the benefits! I often drink tea made by pouring hot water over about six small tips. Let them steep for just a few minutes and then remove before drinking. Add sweetener if desired.
Another way to enjoy Spruce tips is to pickle them, as shown in these photos. Lemony, briney and soft to chew, they’re perfect to chop up and add to potato salad, green salads, deviled eggs, three bean salad, mashed potatoes - the list goes on!
Here’s the recipe for one Half Pint jar:
Collect 2 cups Spruce tips in a clean 1/2 pint mason jar. Really pack them inside the jar up to about one half inch from the top.

Pickled Spruce Tips.
Add six whole black peppercorns
Add one slice of lemon, cut into two haves so they fit better
Add one bay leaf
Add 1/4 tsp. salt
In a sauce pan over medium heat, gently bring to a boil 1/2 cup white vinegar and 1/2 cup water. This will likely be more than needed, but better more than not enough. Once boiling, pour over the Spruce tips and fill the jar to within one half inch from the top. Screw the lid to fingertip-tight. Turn the jar upside down, as this will help seal the jar if you’re not doing a water bath. Let the jar cool to room temperature and then place in a cool dark spot for one month. Once open, refrigerate.
Note: If you’re not doing a water bath, be sure to consume the pickled tips within a month or so after opening. If doing a water bath, the pickled tips should last about six months.
Enjoy trying pickled Spruce tips or Spruce tip tea, and if you have a favorite foraged treat I’d love to hear about it in the comments!
To purchase any of my naturally dyed organic sateens (or linen coming soon), click here.
To catch more of the quilting action and other antics, follow me on Instagram: @tierneybarden