
Long ago, I fell under its spell.
Cyanotypes have captivated me since I was a teenager. I spent summers at my family’s business running blue prints for customers. The process involved a large format blue print machine, large sheets of white paper and ammonia. While the company kept up with the times and eventually did away with the blue print machine, those blue and white prints left a lasting impression.
I recently decided to take a deeper dive into the mysterious world of cyanotypes. I recently devoted myself to exploring the art of the cyanotype and was fascinated by the process all over again. In this post, I’ll describe my process with hopes that anyone who received a September Decadent Textiles box might have an insider’s glimpse at the making of their cyanotype, as well as to share tips and tricks with those of you who might like to try your hand at making them.

Each step in the process of making cyanotypes is a joy, and my favorite moment is watching the images develop. You can’t predict what you’re going to get, which leaves you open to expect the unexpected.
Prepare the Space
The first step was to prepare the work spaces. Deciding to set up shop in our garage, I darkened the windows with flattened cardboard boxes. I also set up a plastic-covered work table for applying the chemical solution, laying out plant cuttings and making the compositions, and then strung cotton clothesline and placed clothes pins on a ladder. Having rubber gloves and pruning shears at the ready proved very helpful. A piece of plexiglass larger than my fabric and paper was handy, and I chose not to use clamps because I was hoping to create more of an ethereal, three dimensional effect. Using clamps would provide even pressure on the objects beneath the plexiglass, and thereby create crisp, well-defined shapes.

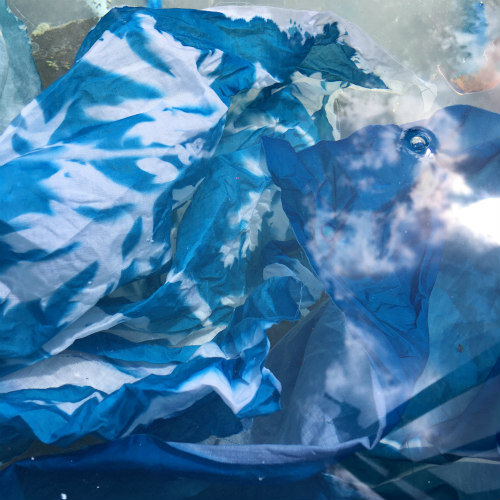
Ephemeral shapes floating on an ocean of cyan blue.
Prepare the Fabric or Paper
The next step is to decide what surface you’d like to print on. I chose to cut Fat Quarters of Moda PFD Batik substrate, as well as Stratton watercolor paper (it’s what I had on hand) cut to a variety of sizes suitable for table top frames, book arts, etc..
With the work space set up and fabrics and papers cut to size, it was time to mix the chemical solution. I found a simple, clear set of instructions online here. I purchased Potassium Ferricyanide (red iron salt) and Ferric Ammonium Citrate (light sensitive iron salt), both by Jacquard. Following the online instructions, I mixed the two solutions in individual glass measuring cups, turned off the lights and stirred them together. I made my way in very low light to the garage work table where the stack of fabric was waiting. On the table, I had set up a small cardboard box “cubby” where I could place the cup of light sensitive solution out of the way and further protect it from light while I worked. I applied the solution to the fabric with with a 3” wide sponge brush. In the future, I’ll play around and try a wide brush and other application tools.
The system I created for myself was to stack two pieces of fabric on the plastic-covered table in front of me, dip the brush in the solution, paint the top fabric, lift it off and hang it up on the clothesline to dry, go back and finish painting the second piece (because it absorbed some solution from the top piece), hang it up, and so on. If your fabric or paper are fully covered with solution, please wear rubber gloves to hang them from the clothesline. I left white space on my fabric for easier handling. Every ten pieces I’d need to mix another batch of solution. Doing so worked for me because my clothesline could only accommodate ten pieces.
I let the fabric thoroughly dry in the dark. This meant my husband received a text on the days he needed to park his car in the driveway. He’s such a good sport! Once the fabrics were completely dry, I took them off the line and stored them inside the house in the dark, flat, and completely covered with bath towels to block out any light. Natural light, the hall light, the nearby bathroom light - any and all, or else the solution would begin to be activated and my efforts would be wasted.
Making Prints
On printing days, I’d take a walk in the sweet smelling autumn air and sunshine to the plethora of golden rod, willow, aster, Queen Anne’s lace, tiny daisies, iris seed pods, ferns of all sorts, grasses, and so many more. I was in my glory gathering up the most interesting wild bouquets to bring back to the garage where I’d sort the plants into groups on the table. Pruners were placed on the table to trim stems as needed. These two steps made it easier and more enjoyable to assemble compositions in the dark.
This might be a good place to say that any objects can be used to make cyanotypes. I chose fresh plants that represent the place I’ve called home for my entire life, but pressed plants would be great and would give more defined edges, especially if working on paper. If I had thought about it in time, I’d have used the hawk and turkey feathers collected from previous walks. I did occasionally use a small lace doily sweetly gifted by my dear friend, Marion. I thought it might be a lovely way to share her gift, and the doily could make a great spot for embroidering a loved one’s initials or other lovely marker of time and place.

What a joy to create daily wild bouquets that would be permanently captured and sent out into the world in a such a manner that the recipient could further transform and personalize.
When ready, I’d bring two pieces of coated fabrics to the dark garage, always immediately re-wrapping the remaining stack of prepared fabrics, and lay the fabric on a big enough piece of rigid foam insulation board to fit two fabrics side by side. If you don’t have foam a board, you could use a piece of foam core, masonite or anything else that is lightweight, smooth and easy to carry around. Working in the dark, I took my time making unique compositions. A helpful tip: if working in layers, what ever is laid down first will appear to be in the foreground once the print is developed. Also, experiment with a variety of textures and sizes of objects for added interest. I made most compositions in a spontaneous manner to convey the wild environment in which the plants grew. One neat technique I read about that I enjoyed using was to flick water onto the side of the plexiglass that will make contact with the plants before exposing to sunlight. Once out in the sun, tap or lightly press the plexiglass to cause the water droplets to make contact with the fabric. You can see the effect in the photo just below.

Water droplets making contact with the solution to create another layer of interest.

A Fat Quarter adorned with flowers and leaves topped by plexiglass being exposed under the sun’s rays for ten minutes. No worries, the condensation didn’t transfer to the finished print.
Exposure
Once satisfied with the arrangements, I laid a large piece of plexiglass (sometimes flicked with water droplets) over each fabric, raised a garage door and quickly brought the foam board out to the driveway or the sidewalk (where ever it was most protected from wind). Working on bright sunny days, I waited ten minutes, but this is another opportunity for experimentation. Also, give some thought to the direction of the sun in relation to the orientation of your print.
During those ten minutes, I’d fill a few bins with water from the hose.
Developing
After enough exposure time had passed, I’d put on rubber gloves (very important!) and bring the board to the water bins. The plexiglass and plants were quickly removed from one piece of fabric and the fabric swiftly plunged into a water bin. The print developed in the water as the chemical solution rinsed free. With rubber gloves still on, the fabric was swished around to remove most of the chemical solution, but it was necessary to also rub the fabric on itself all around the edges to make sure the solution was worked out of the fibers. If you’re working at a sink with a sprayer, the sprayer will do this important task. Because I was working outdoors, I’d wring out the fabric in the first bin and then move it to the next one and swish, scrunch and otherwise give it another good rinsing through. Then I’d move it to the third water bin, swoosh it around some more and then let it sit in there while I repeated the process with the other piece of fabric. All the while, I’d marvel at the transformation happening before my eyes, fabric turning from yellow-green and gray-purple to that magical cyan blue and white. Fascinating every time.
Back to work, the wet fabric pieces were hung on the clothesline inside the garage. I’d work in batches, two pieces at a time between the hours of 11:00 and 2:00. If the day was overcast, I’d just add two or three minutes, making it a twelve or thirteen minute exposure. At the end of each session, I’d dispose of the plants in the burn pit where animals couldn’t get at them.
Finishing
Once the fabrics had been allowed to further develop on the clothesline for 24 hours, they were ready to be pressed with a dry hot iron. I read that heat degrades the print so I worked quickly with the iron. As I’ve long said about my eco-bundles and my vat dyed fabrics, I never truly know what’s been captured on the fabric until it’s ironed. When I’m at the ironing table I’m blessed with another wave of ooohh’s and aahhh’s. Please don’t miss the two links at the end of this post, especially the second link, meeting Anna Atkins and her highly renown book of cyanotypes. Extraordinary.
All told, I made over sixty fabric cyanotypes. About half of them were included in the September Decadent Textile boxes leaving the other half to be listed in my shop in early November. I’ve been working behind the scenes to fill the shop with beautiful items in time for the holidays and will send announcement when the listings are live.

A representation of the more than sixty 18” x 22” cyanotypes made for the September Decadent Textile boxes.
If you have a September box, you can quickly iron the folds of your cyanotype with a dry hot iron. If you use yours to make an item that will be washed, use gentle detergent and cold water, air dry if possible.
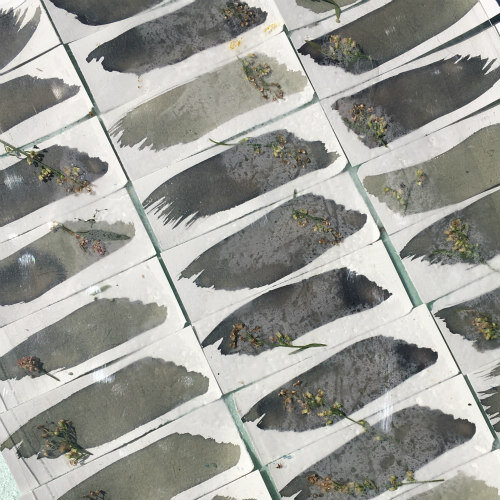
I couldn’t resist making cyanotype mailing labels for the September boxes. I used a fairly sturdy cotton rag paper and I wrote addresses with a white pencil. I have to say that they looked smart against the brown paper-wrapped packages. A last-minute decision that thankfully worked out well.

Mailing labels with small flower stems ready for exposure to the sun’s rays.
Exposure under way.

Developed labels floating in water. Once completely rinsed, the labels were set out to dry.
Cyanotypes are a safe and wonderful project to do with kids. I invited my nine year old niece for an art date and to see her slow down and look more closely at the flowers and leaves was pretty special. She took note of the varied shapes and textures and learned where best to prune. She followed my every instruction, her hands didn’t touch the chemical solution and she wore rubber gloves when rinsing the fabrics and papers. If you’re working with young people, consider first demonstrating a print or two so they better understand what to expect.
When making her compositions, my niece worked steadily and without stopping, picking up selections and swiftly placing them around on the papers and fabrics. She and I worked differently, yet each of our methods produced excellent results. She was thrilled with her prints, rightly so. Our next art date will be to sew her fabric cyanotypes into a pillow for her bedroom. Seeing her so proud and excited by what she had made was a joy to behold.
If you’ve made something with your September box cyanotype, please share! We’d love to see: @tierneybarden
Two excellent links for further reading:
Brief history of cyanotypes and a how-to: https://blog.scienceandmediamuseum.org.uk/introduction-cyanotype-process/
Meet Anna Atkins and see images from her renown book, Photographs of British Algae: https://www.nhm.ac.uk/discover/anna-atkins-cyanotypes-the-first-book-of-photographs.html